Playing Cards explores the use of WebAR for the preservation and communication of historical play activities. In this project we used AFrame and AR.js to create an accessible and fast response Multi-Marker Augmented Reality application.
TL;DR code and markers on GitHub here and a live example here
Context
Together with the Time Telephone, “Playing Cards” is one of the prototypes developed within the research project Playing the Archive, a programme of research and cultural production, exploring the nature of play by bringing together archives, spaces and technologies of play. At the core of the research project is a collection of more than 20,000 accounts of play, written by British children between the 1950s and 60s and gather by folklorists Iona and Peter Opie. This large number of documents is an invaluable source of knowledge on children’s street culture. As other intangible cultural heritage archives, one of the main challenges is to provide effective solutions to access, query and visualise the single elements of the collection, but also explore different form of representation in addition to the existing written texts and drawings. Other media, such as historical and contemporary audio and video recordings, contribute to enrich the heterogeneous mix of memory fragments that help in the communication and preservation of historical play activities. “Playing Cards” explores the combined use of digital and physical interfaces as means to communicate the variety of the Opies collection, with the aim of letting anyone playfully engage with historical memories of play by virtually overlay them on their surroundings using Augmented Reality.
A collaborative process
We outlined the form that the digital/physical prototype would have taken from the results of a series of workshop lead by the Playing the Archive team with the Victoria & Albert Museum of Childhood in London and the Site Gallery in Sheffield. The idea of an augmented deck of cards was chosen over the other proposals. Each card presents, on the front, a game or rhyme selected from the Opies archive, and on the back, a marker to trigger an Augmented Reality experience. During these meetings our colleagues at the Museum of Childhood and at the Site Gallery helped us to highlight the requirements that the Augmented Reality experience would have to fulfil, considering the final users:
- Ease to use is essential, for both users and maintainers;
- Ease to customise, by adding or modifying the content. Possibly based on non-commercial licences;
- Able to represent heterogeneous media, such as images, texts, audios, videos and 3D models;
- And finally, accessible from any device and different OS, in order to limit the “digital divide”, and address the unwillingness to download apps;
Augmented Reality on the Web
These requirements set important limits to the development of our Augmented Reality application. Google ARCore and Apple ARKit are great tools, and you will see them soon on our blog, however, they do not fully meet the above-mentioned requirements: considering the accessibility, both tools are mainly bind to their own platforms (Android and iOS) and old devices are not always supported; major update of the OS, or of the libraries, could break a previously working App; third party tools, that could require also commercial licences, need to be learn for developing these AR experiences. Finally, the unwilling to download and install Apps, in particular during temporary museum exhibitions, pushed us to consider a different solution. As the most advanced features provide by ARCore and ARKit were not essential for developing our prototype (features such as marker-less tracking, vertical and horizontal planes detection, light estimation, AR anchors etc.), but we simply needed to link a digital media object (audio and video) to a marker, we started exploring the possibilities offered by WebAR. Simply put, WebAR gives the possibility to consume Augmented Reality experiences within a web-browser. There is no need to install any application on the device, and the development environments are generally platform agnostic, based on HTML and Javascript. At the time of our project, WebAR had already reached a good grade of stability, and performances, to be used in production.
Among the available WebAR solutions, AR.js caught our attention. AR.js is a great open source library for doing marker-based Augmented Reality on the web. Build to be used on the top of AFrame, it is based on the well know JS porting of ARToolkit. AR.js is fast, reliable and works on multiple devices and platforms, such as Android and iOS devices (Android >4.4 or iOS >11) equipped with a camera. This was already enough to address half of the requirements for our prototype. But is it easy to use? And which contents are supported?
Hello AR World
The GitHub repository of AR.js is a great starting point to see what WebAR is capable of. How easy is it to use? 10 lines of HTML is what you need to run the AR.js Hello World. Nothing more than that:
<!doctype HTML>
<html>
<script src="https://aframe.io/releases/0.9.2/aframe.min.js"></script>
<script src="https://raw.githack.com/jeromeetienne/AR.js/2.0.8/aframe/build/aframe-ar.js"></script>
  <body style='margin : 0px; overflow: hidden;'>
    <a-scene embedded arjs>
      <a-marker preset="hiro">
          <a-box position='0 0.5 0' material='color: yellow;'></a-box>
      </a-marker>
      <a-entity camera></a-entity>
    </a-scene>
  </body>
</html>
Copy and paste these 10 lines in a index.html, open it on a local server (HTTPS if you are testing it on Chrome, in order to access the camera, another solution is to use Github Pages) and we are ready to go.
Let’s break it down
We first load both AFrame and AR.Js libraries:
<script src="https://aframe.io/releases/0.9.2/aframe.min.js"></script>
<script src="https://raw.githack.com/jeromeetienne/AR.js/2.0.8/aframe/build/aframe-ar.js"></script>
Then, within the <body> we create an AFrame scene <a-scene>, and we tell to AFrame that we want to create an AR experience, by adding the component ‘arjs’ as HTML attribute. We add a marker entity <a-marker> that use the marker Hiro (Hiro is embedded in ARjs and the PNG can be found here) and, inside the marker, the entity <a-entity>we want to visualise on top of the marker, in this example, a yellow box. Finally, we add a camera <a-entity camera> to see our creation.
From a single marker to multiple customised markers
The online tool Marker Training made the creation of new markers extremely easy
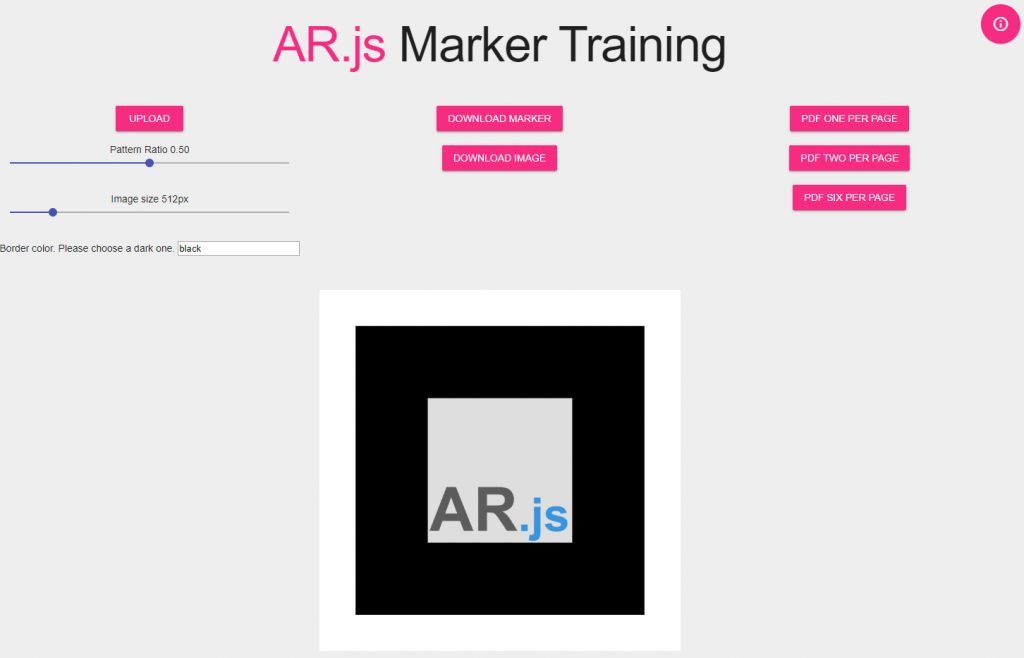
Once the image we want to use as marker is ready, we just need to upload it, set the dimension of the border/frame and download the PATT file, the pattern recognised by the camera that we will need to add in our code, and the original image with the black border, the actual marker used to trigger the AR experience. We soon realised that create a marker is not the same of create a good marker, and create 18 unique personalised markers was even a harder task.
How to build a good marker? Trial and error
The pattern used by AR.Js is the same used by ARtoolkit: the images are transformed in a 16 pixels by 16 pixels matrix for each B(lue) G(reen) R(ed) channels and 4 orientations. Due to the low resolution of the matrix the source images should not contain too many details. In particular when multiple markers are used, as they can produce false response due to similarity of the markers used:
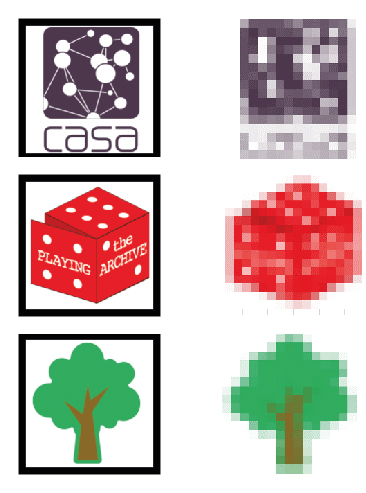
The original images and their PATT equivalent
From the information available online, and further test conducted by us, a good marker:
- Must have a continuous black frame (since AR.Js version 1.7.1 also coloured borders are accepted). A larger frame makes recognition process easier and faster but reduce the area available for our custom image. We found a good threshold using 85%. The dimension of the border is important because it needs to be input as a constant in our code, therefore it is better to have all the markers of the same AR experience using the same border thickness.
- In addition to the black border, it is better to have an external white or high contrasted area. It makes recognition process faster.
- The markers must be square. The image inside the border needs to be square as well, or it will be stretched, and without continuity with the black frame.
- The image use inside the frame should be rotationally asymmetric in order to detect the orientation of the marker. The content could be black and white or coloured.
- Within certain extent, the dimension of the marker is not critical. The smaller marker we tested was 1cm by 1cm without any sensible difference compared to the bigger markers.
- The material of the markers should not be too reflective and the colours as close as possible to the RGB values.
In collaboration with Site Gallery in Sheffield we developed a series of different design solutions for the markers and, in their final versions, they worked just fine:
How to add different content to the different markers?
Theoretically, and practically, it is be possible to develop a multi marker experience just using the previous 10 lines of html. Just duplicate the <a-marker> for the number of markers to use, paying attention to change the type attribute of the marker to pattern and by adding the URL to the PATT file we downloaded. From:
<a-marker preset="hiro">
To:
<a-marker type="pattern" url=”PATH/TO/FILE.PATT”>
This is not the best way to do it, especially if we want to provide a flexible and customizable solution. To take the best advantage of AR.js we had to add some javascript to our project: we reduced the lines of our HTML and let our script multiMarkersName.js do all the work.
<!DOCTYPE html>
<html>
 <head>
  <title> Multi Markers AR - Playing the Archive - CASA UCL</title>
   <meta name="description" content="Multi Markers AR - Playing the Archive - CASA UCL">
    <script src="https://aframe.io/releases/0.9.0/aframe.min.js"></script>
    <script src="https://raw.githack.com/jeromeetienne/AR.js/2.0.8/aframe/build/aframe-ar.js"></script>
    <script src="js/multiMarkersName.js"></script>

 </head>
  <body>
   <a-scene markers_start vr-mode-ui="enabled: false" color-space="sRGB" renderer="gammaOutput: true" embedded arjs='debugUIEnabled: false; sourceType: webcam; patternRatio: 0.85; trackingMethod: best;'>
     <a-entity id='userCamera' camera>
        <a-cursor> </a-cursor>
     </a-entity>
   </a-scene>
  </body>
</html>
The marker_start attribute is a custom AFrame component added to the <a-scene> and defined in the multiMarkersName.js script.
var markersURLArray=[];
var markersNameArray=[];

AFRAME.registerComponent('markers_start',{
  init:function(){
    console.log('Add markers to the scene');
    var sceneEl = document.querySelector('a-scene');

    //lists of the markers
    for(var i=1; i<19; i++)
    {
      var url="resources/markers/pattern-Individual_Blocks-"+i+".patt";
      markersURLArray.push(url);
      markersNameArray.push('Marker_'+i);
    }

    for(var k=0; k<18; k++)
    {
      var markerEl = document.createElement('a-marker');
      markerEl.setAttribute('type','pattern');
      markerEl.setAttribute('url',markersURLArray[k]);
      markerEl.setAttribute('id',markersNameArray[k]);

      markerEl.setAttribute('registerevents','');
      sceneEl.appendChild(markerEl);

      //Adding a text to each marker
      var textEl = document.createElement('a-entity');

      textEl.setAttribute('id','text');
      textEl.setAttribute('text',{color: 'red', align: 'center', value:markersNameArray[k], width: '5.5'});
      textEl.object3D.position.set(0, 0.7, 0);
      textEl.object3D.rotation.set(-90, 0, 0);

      markerEl.appendChild(textEl);
    }
  }
});
In our component we have two for-loop: the first one is going through the 18 PATT files (our markers in the resources/markers/ path) to create two arrays: the first one with the URL of the PATT files, the second an unique ID for each marker.
for(var i=1; i<19; i++)
    {
      var url="resources/markers/pattern-Individual_Blocks-"+i+".patt";
      markersURLArray.push(url);
      markersNameArray.push('Marker_'+i);
      //console.log(url);
    }
The second loop is the one that create the markers. For each iteration it creates an empty
for(var k=0; k<18; k++)
    {
      var markerEl = document.createElement('a-marker');
      markerEl.setAttribute('type','pattern');
      markerEl.setAttribute('url',markersURLArray[k]);
      markerEl.setAttribute('id',markersNameArray[k]);

      markerEl.setAttribute('registerevents','');
      sceneEl.appendChild(markerEl);

      //Adding a text to each marker
      var textEl = document.createElement('a-entity');

      textEl.setAttribute('id','text');
      textEl.setAttribute('text',{color: 'red', align: 'center', value:markersNameArray[k], width: '5.5'});

      textEl.object3D.position.set(0, 0.7, 0);
      textEl.object3D.rotation.set(-90, 0, 0);

      markerEl.appendChild(textEl);
    }
and finally, it adds all the markers to the <a-scene>
sceneEl.appendChild(markerEl);
registerevents is another custom component to detect when AR.js emits the events markerFound and markerLost, when it detects or loses the view of a marker respectively. Using an addEventListener for each marker allows us to know which marker is detected and, for example, to play and stop audio and video objects.
AFRAME.registerComponent('registerevents', {
    init: function () {
      const marker = this.el;
      marker.addEventListener("markerFound", ()=> {
        var markerId = marker.id;
        console.log('Marker Found: ', markerId);
      });
      marker.addEventListener("markerLost",() =>{
        var markerId = marker.id;
        console.log('Marker Lost: ', markerId);
      });
    },
  });
To check if the markers are detected properly, we can keep an eye on the console or, even better and useful to develop the final part of the project, create a dummy text with the id of the marker, as in the video above:
var textEl = document.createElement('a-entity');

textEl.setAttribute('id','text');
textEl.setAttribute('text',{color: 'red', align: 'center', value:markersNameArray[k], width: '5.5'});
textEl.object3D.position.set(0, 0.7, 0);
textEl.object3D.rotation.set(-90, 0, 0);

markerEl.appendChild(textEl);
We create an <a-entity>with the component ‘text’ that use as ‘value’ the uniqueID of the marker and we append this entity to the marker. The markers can hold any kind of entity or multimedia objects such as videos, images, audios, 3D models. In our prototype each marker holds a audio-video file.
You can find the repository of this example on our GitHub and a live example at https://ucl-casa-ce.github.io/AFrame_AR_Multimarkers/
Our Playing Cards:
 )
)